What Are Templates?
Simply put, templates are preset, formatted content that can be stored and used in different channels or programs. In Onboard Me, templates are designated by category and messaging type; otherwise, "snippets" can be stored for customization later.
Quick Training Links
- Common Use Cases For Templates
- Your Templates Dashboard
- Templates Dashboard Functions
- Create Your First Template
- Adding A Saved Email or SMS Template To A Sequence Message
- Adding A Saved Email Template To A Broadcast Message
- Adding A Content Template To A Content Editor
- Sending Your Template To A Contact Manually
- Sending Your Template To A Contact Automatically
Common Use Cases For Templates
- Sending a saved message to someone
- Sending a pre-written text to someone
- Adding saved content to any content editor
Your Templates Dashboard
Navigating your templates dashboard is :
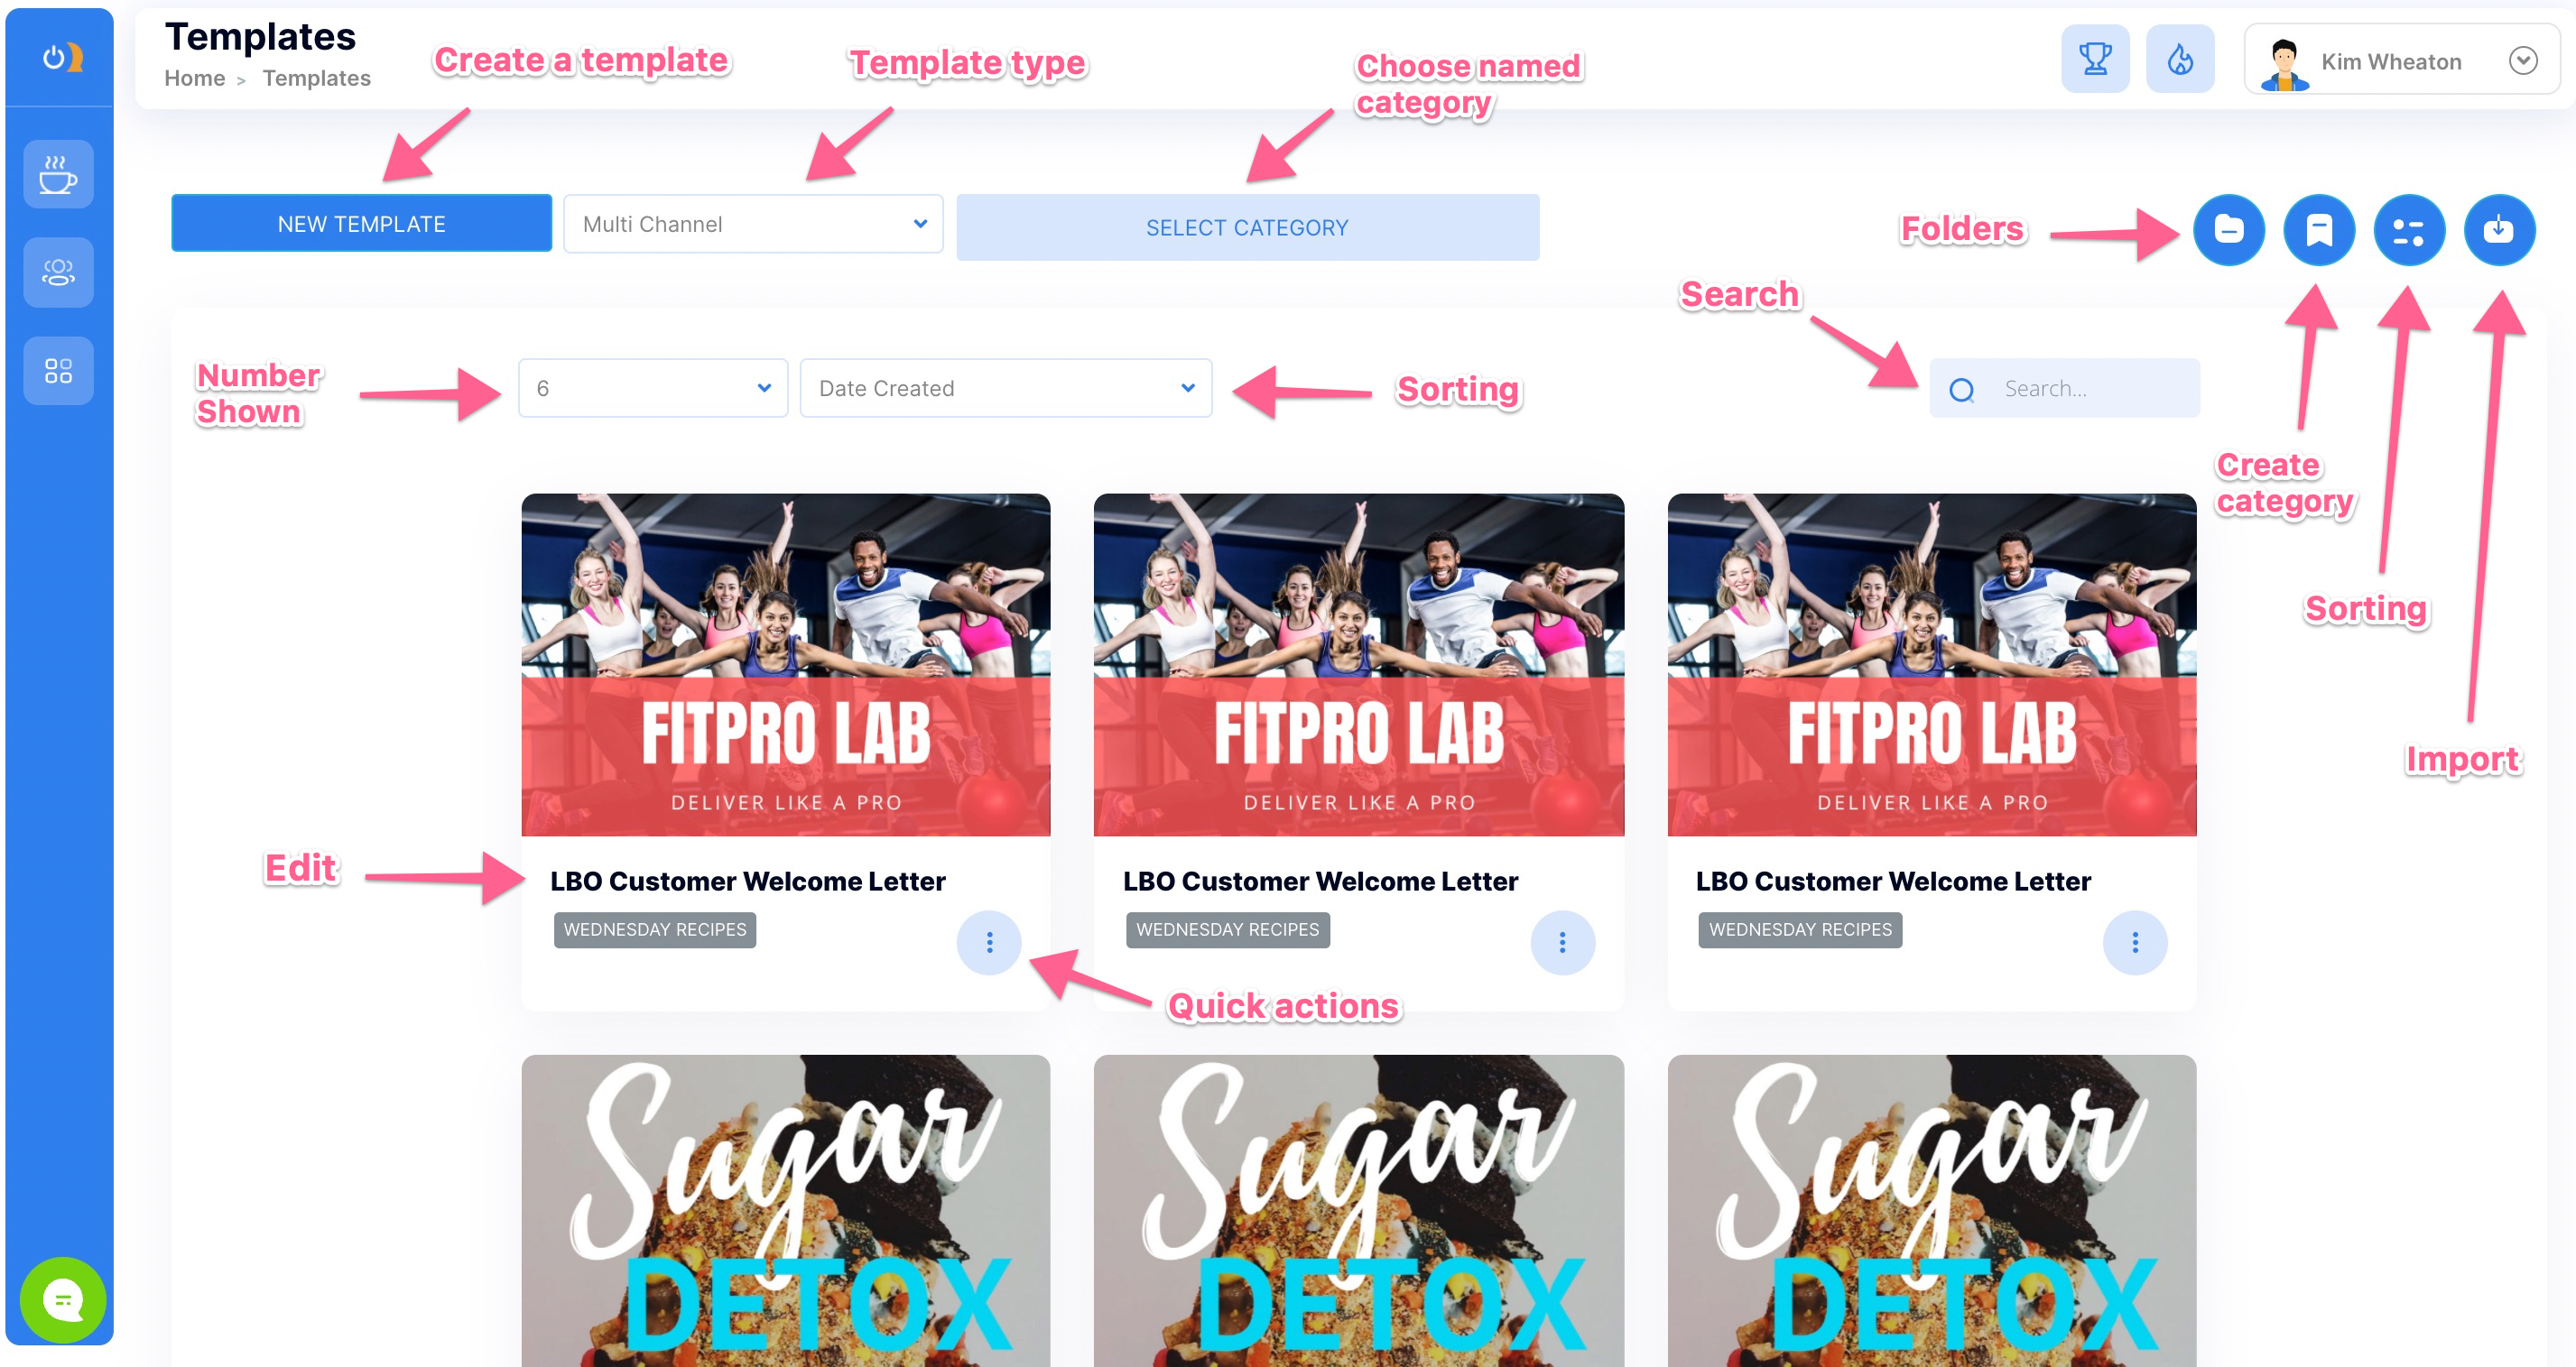
Templates Dashboard Functions
Importing a template
Importing a template is as easy as logging into your Onboard Me account and (while logged in) clicking any share link. You can also use the import feature shown below:
Sorting your thumbnails
If you are like most of our Onboard Me users, you love an organized dashboard. We make it simple to customize the appearance of your templates on your main dashboard. Simply click the sorting icon, arrange the titles in the way you would like them to be displayed, and save your sorting.
Creating folders
Want to take template organization to a whole new level? You can create broader categories and sort templates into named folders. For instance, you may have specific messages or promotions scheduled for certain times of the year. You could consolidate all of your December email newsletters into one folder for easy retrieval in December.
Creating a thumbnail image
Hover over your template thumbnail to reveal the pencil icon. Click this to select an image from your personal library or search within the free images provided.
Quick template options
To take action on a template without entering the editor, select the MORE menu by clicking the three dots located on your template thumbnail.
Here are the actions you can take with the quick page option:
- Edit your template
- Move your template to a folder
- Share it with another business location
- Show your template analytics
- Share your template
- Duplicate your template
- Delete your template (sad moment)
Create Your First Template
To create your first template, click New Template on your dashboard and select the type of template you would like to create. This could be an email, SMS, Voice, or Multi-Channel template. You can also create a smaller snippet, which can be integrated into larger templates or used for different purposes later.
Message type and name
Select the type of message your template will be. Let's say you're creating an email template, for the sake of this example. Click email, then select a category that best fits your new template (click "create category" above the drop-down if you want to create a new one).
Save and preview your template
Be sure to hit the save button once your template content has been added. To preview your template, click the eye icon under the main content field and send yourself (or whomever you designate) a preview of your work to make sure it's to your liking.

Adding A Saved Email or SMS Template To A Sequence Message
Step 1: Navigate to your sequences dashboard and click the title of the sequence you wish to edit.
Step 2: Inside your message editor on the bottom right you will see a link that says Library. Click it.
Step 3: Select the correct template category.
Step 4: Select the desired email or SMS template.
Step 5: Insert the desired template into your message editor by clicking the checkbox.
Adding A Saved Email Template To A Broadcast Message
Step 1: Navigate to your broadcasts dashboard and click the title of the broadcast you wish to edit for your drafts.
Step 2: Inside your broadcast message editor on the bottom right you will see a link that says Library. Click it.
Step 3: Select the correct template category.
Step 4: Select the desired email template.
Step 5: Insert the desired template into your broadcast message editor by clicking the checkbox.
Adding A Content Template To A Content Editor
Step 1: Navigate to the content you wish to edit in any content editor.
Step 2: Inside your content editor on the bottom right you will see a link that says Library. Click it.
Step 3: Select the correct template category.
Step 4: Select the desired content template.
Step 5: Insert the desired content template into your content editor by clicking the checkbox.
Sending Your Template To A Contact Manually
There are 2 common ways to send a template to a contact manually. You can use your contact launch pad and the send template feature or you can use your contact center bulk action feature.
Launchpad method:
Step 1: Navigate to your contact center and locate the specific contact you wish to send a templated message to.
Step 2: On the far right of the contact row you will see 3 verticle dots. Click this icon to open the contact launchpad
Step 3: From the launch pad 'Actions menu' select Send Template.
Step 4: Select your template type and category
Step 5: Select your desired template using the checkbox and add any conditions you desire.
Step 6: Once satisfied with your settings hit send.
Bulk action method:
Step 1: Navigate to your contact center and locate the specific contacts you wish to send a templated message to.
Step 2: Click bulk action > Templates > Send template for the nested menus
Step 3: Select your desired template type and category
Step 4: Select your desired template using the checkbox and add any conditions you desire.
Step 5: Once satisfied with your settings hit send.
Sending Your Template To A Contact Automatically
To send a template automatically, add it to any existing journey as an additional action or as a solo action.
Step 1: Navigate to any created journey or create a new journey
Step 2: Verify your journey name and trigger are correct.
Step 3: Add or Send Template as an action
Step 4: Configure type and category, then select your desired template.
Step 5: Choose sending method, and configure delays and conditions
Step 6: Save the journey and make sure the journey toggle is ON.