What Are Pipelines?
Pipelines are vision boards showing the real-time progress of a manual or automated workflow or process. If you have ever seen a Trello board (known in project management circles as a Kanban Board) you will quickly understand the power of pipelines in your business.
Quick Training Links
- Common Use Cases For Pipelines
- Your Pipelines Dashboard
- Pipelines Dashboard Functionality
- Creating Your First Pipeline
- Set Your Stage Names and Overall Values
- Save Your Pipeline or Your Master Template
- Configure Your Pipeline Stage Settings
- Add Your Pipeline Stage Actions (If Any)
- Preview Or View Your Live Pipeline
- Add Contacts To Your Pipeline Manually
- Move Contacts Between Stages Manually
- Add Contacts To Your Pipeline Automatically
- Move Contacts Between Pipeline Stages Automatically
- Understanding Your Pipeline Contact Card
- Reviewing Your Pipeline Analytics and What They Mean
- Troubleshooting Your Pipeline
Common Use Cases For Pipelines
- Automating a complicated sales process
- Tracking the progress of a group challenge
- Creating a master training series
- Hiring the perfect employee
- Onboarding a new client
- Onboarding a new employee
- Hiring a new vendor or contractor
- Onboarding a new vendor or contractor
- Hiring a new social media consultant
- Onboarding a brand ambassador
- Building a high ticket coaching program
- Delivering a high ticket coaching program
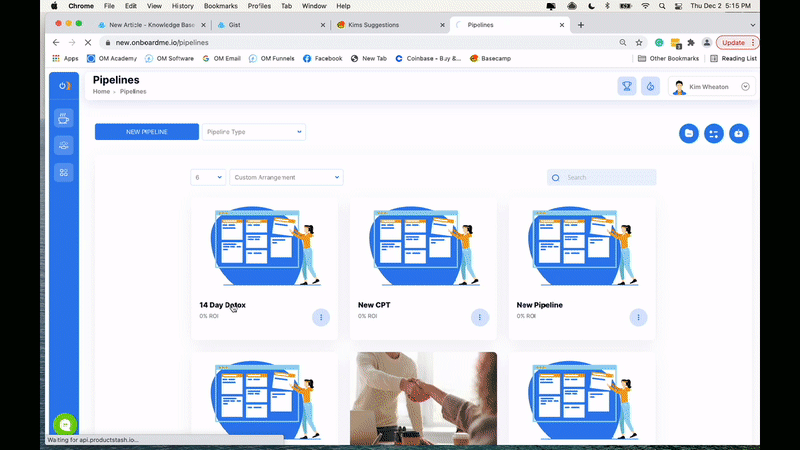
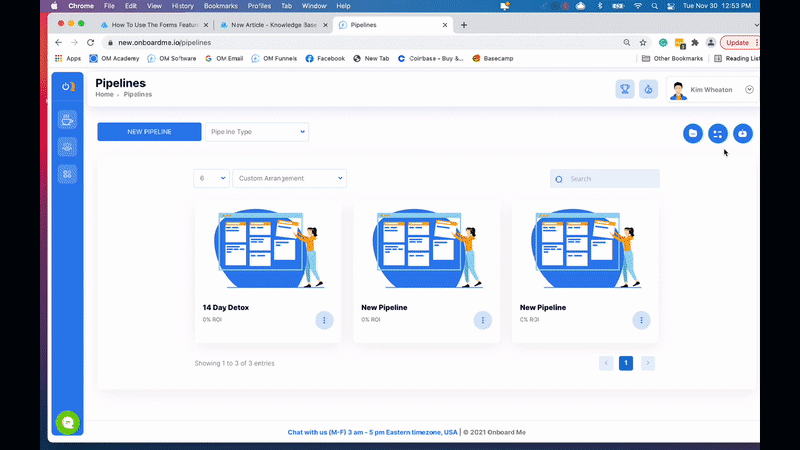
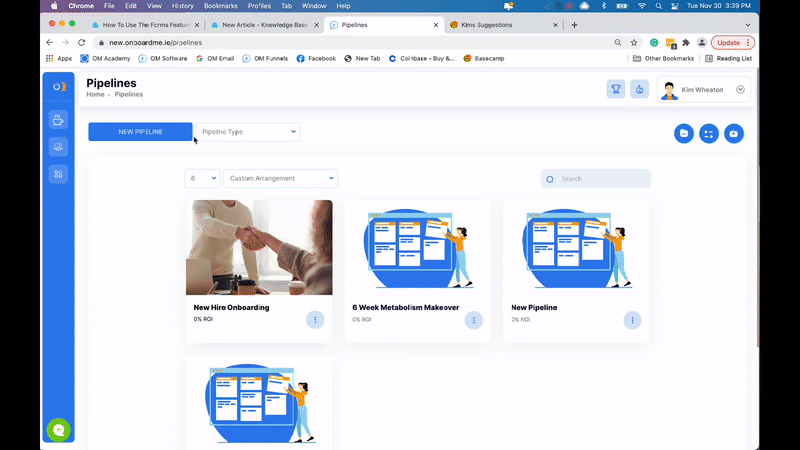
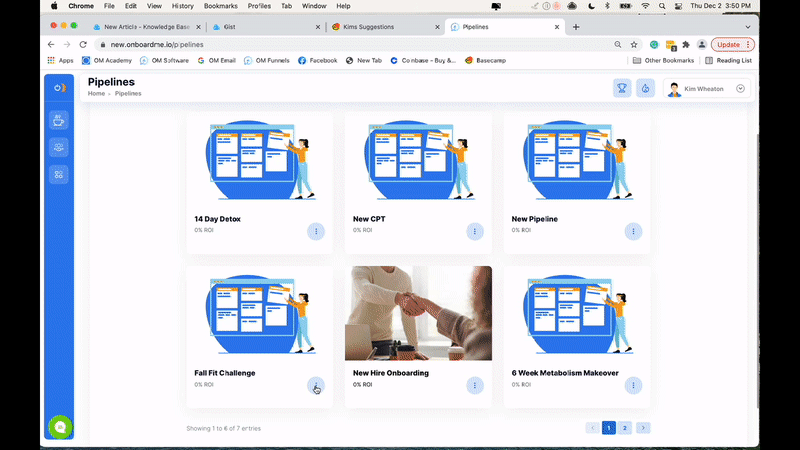
Your Pipelines Dashboard
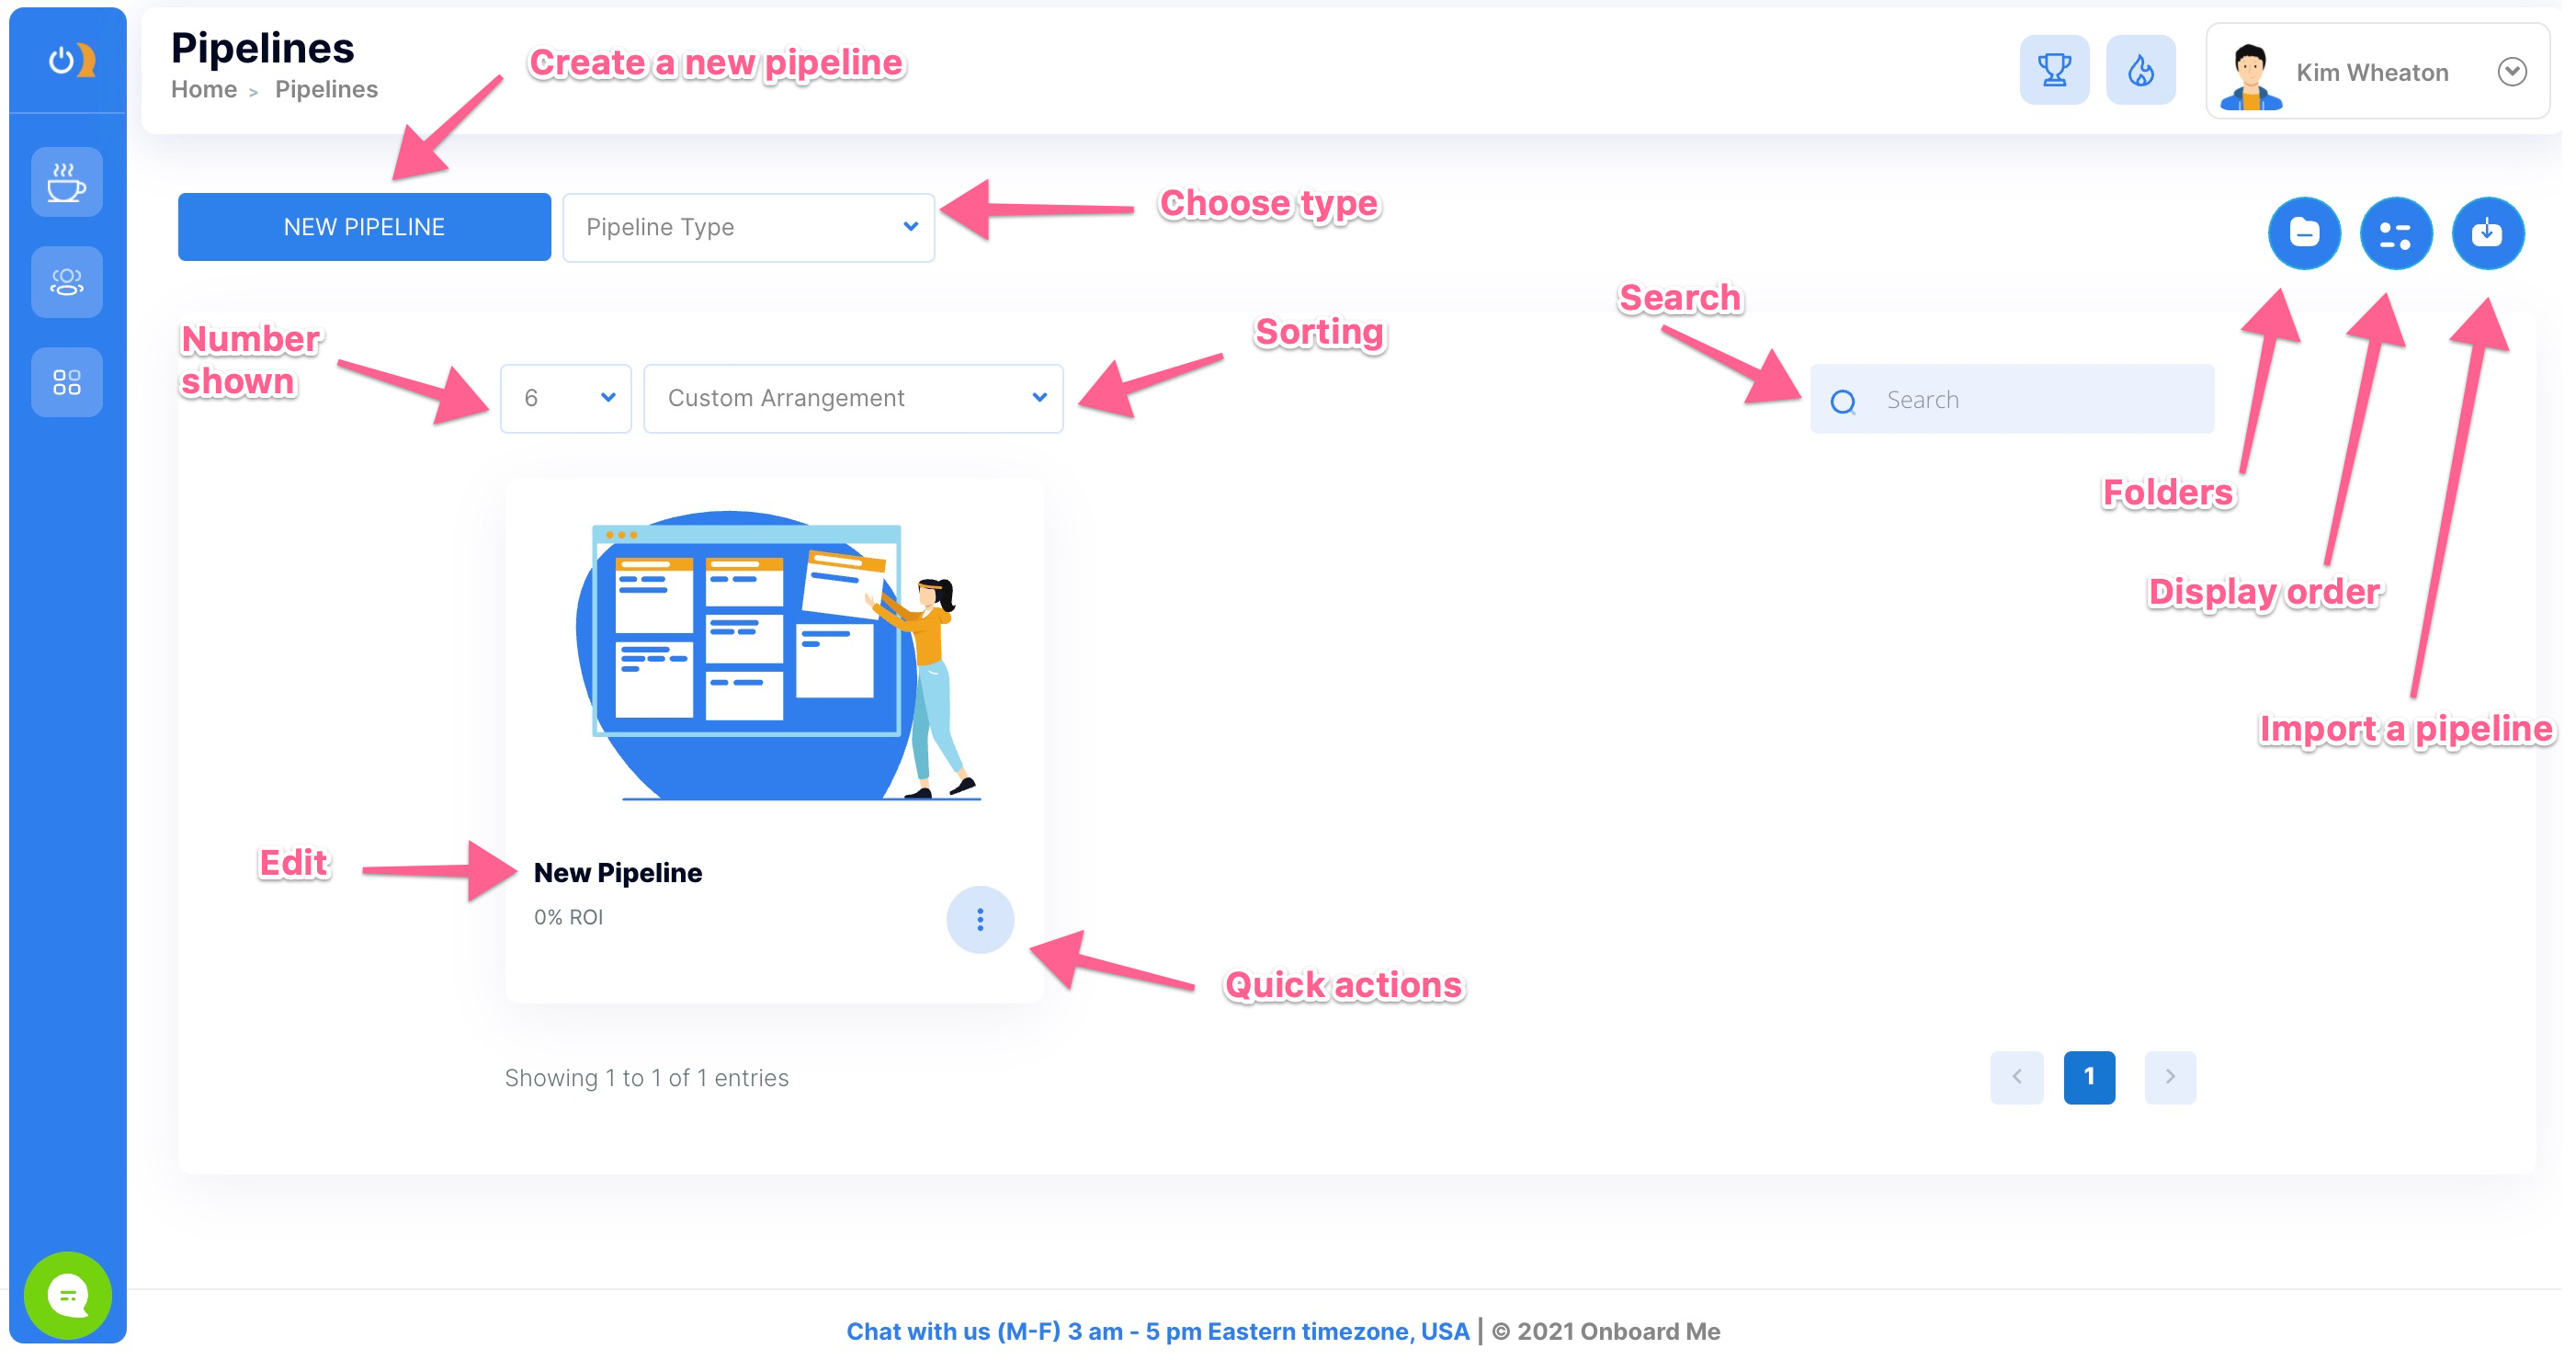
Pipelines Dashboard Functionality
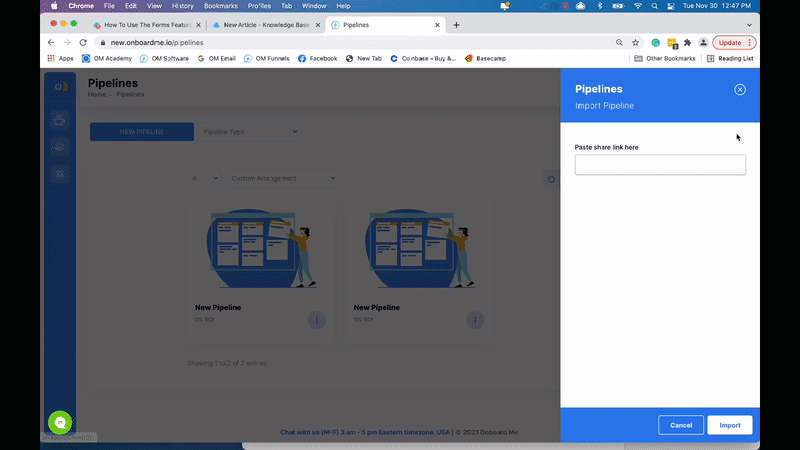
Importing a pipeline
Importing a pipeline is as easy as logging into your Onboard Me account and clicking any share link. You can also use the import feature shown below:
Sorting your pipeline thumbnails
If you are like most of our Onboard Me users, you love an organized dashboard. We make it simple to sort how your pipelines show up on your main dashboard. Simply click the sorting icon, arrange the titles as you would like them to be displayed, and click save.
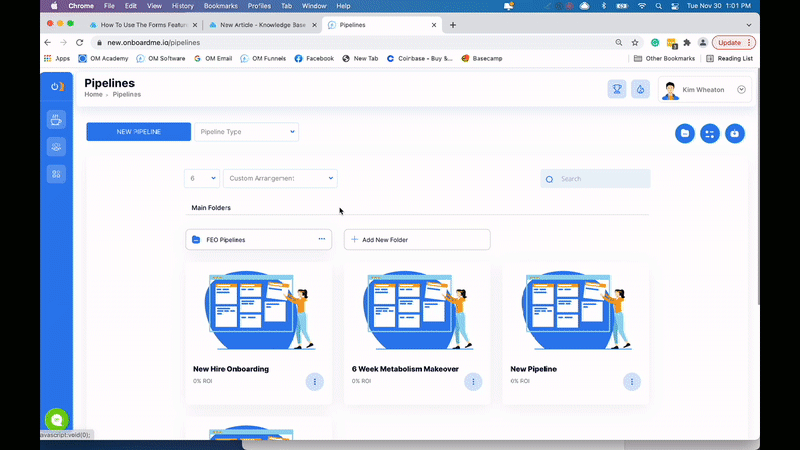
Creating pipeline folders
Want to take pipeline organization to a whole new level? You can create broader categories to represent a group of pipelines and sort by folder name. Let's say you have 3 offers that get rotated throughout the year: a 28-day jumpstart, a VIP class pass, and a meal prep workshop. We would call these Front End Offers or FEO's. So your folder name might be FEO Pipelines.
Then, all future FEO pipelines would have a home as well. When you want to update or reactivate an FEO, just head to that folder.
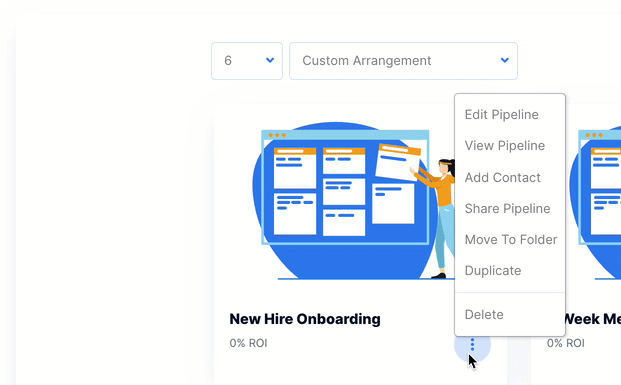
Quick pipeline options
To take action on your pipeline without entering the editor, select the MORE menu (three dots) located on your pipeline thumbnail.
Here are the actions you can take with these quick options:
- Edit your pipeline
- View your pipeline dashboard
- Add a contact to your pipeline
- Share your pipeline with another Onboard Me user
- Move your pipeline to an existing folder
- Duplicate your pipeline
- Delete your pipeline (sad moment)
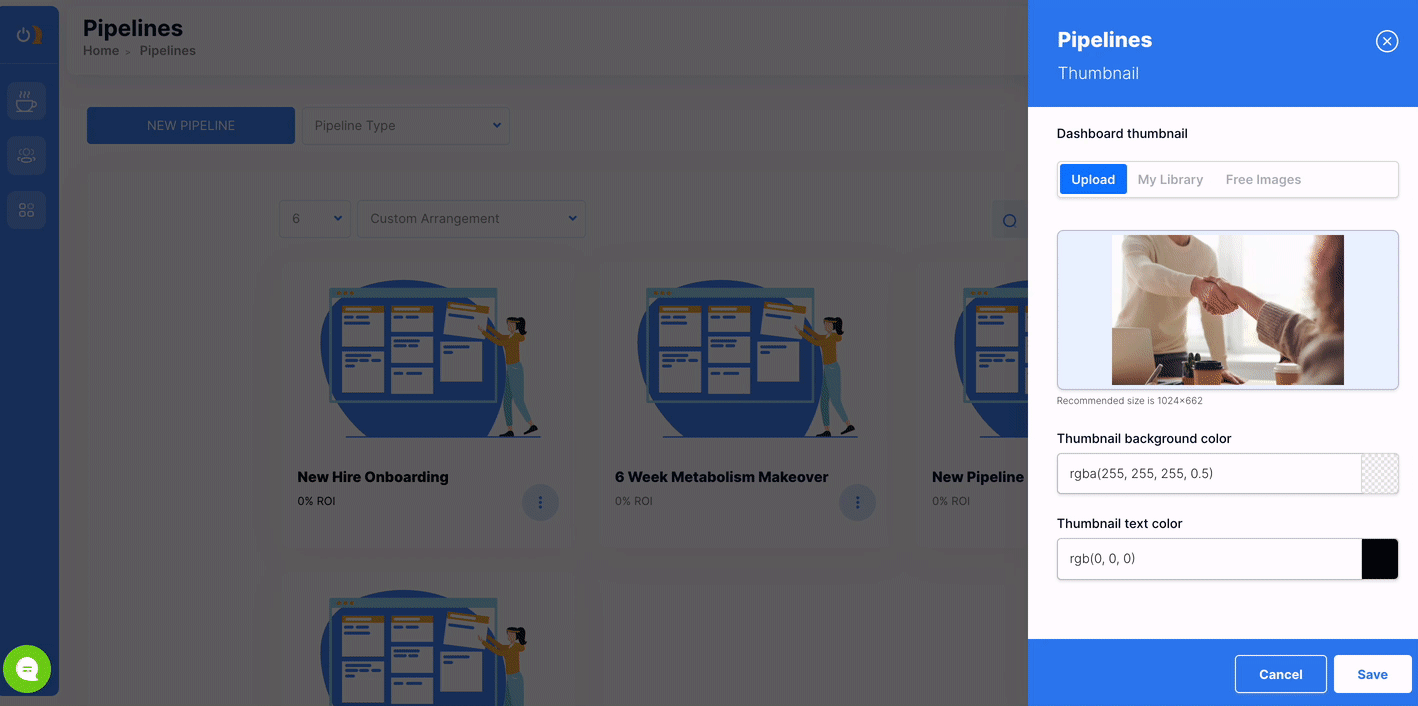
Updating your pipeline thumbnail image
When you create a new pipeline we give you a beautiful default thumbnail image that you can either keep or customize. We even give you Canva templates. If you would rather search for an image, Onboard Me provides a free library where you can select the best option for your thumbnail.
Creating Your First Pipeline
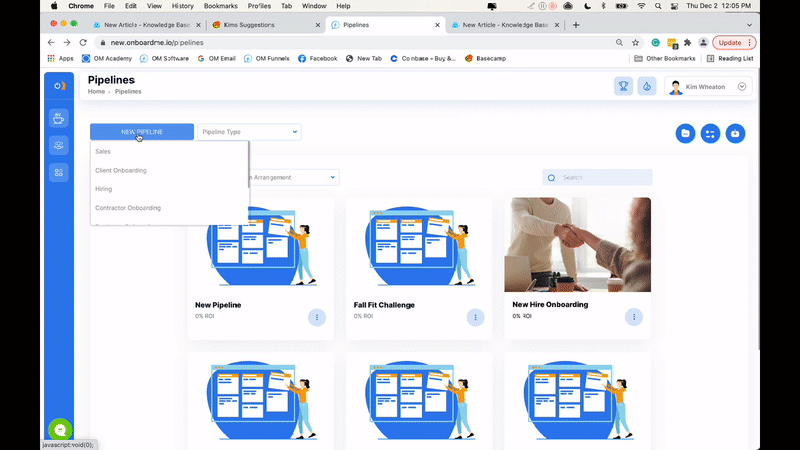
Creating your pipeline is simple. Just click the New Pipeline button on your pipelines dashboard, give it a name and decide if you want to use one of our templates below or create your own.
Our 5 pre-made templates are:
- Sales pipeline
- Client onboarding pipeline
- Hiring pipeline
- Employee onboarding pipeline
- Contractor onboarding pipeline
You can also make your own template and configure it any way you like! Learn how to create your first template.

Creating your own pipeline types
After selecting the Create Pipeline button on your pipeline dashboard, scroll to the bottom and select New Category. Then name your category and click Create. You can edit the category name and/or template at any time.
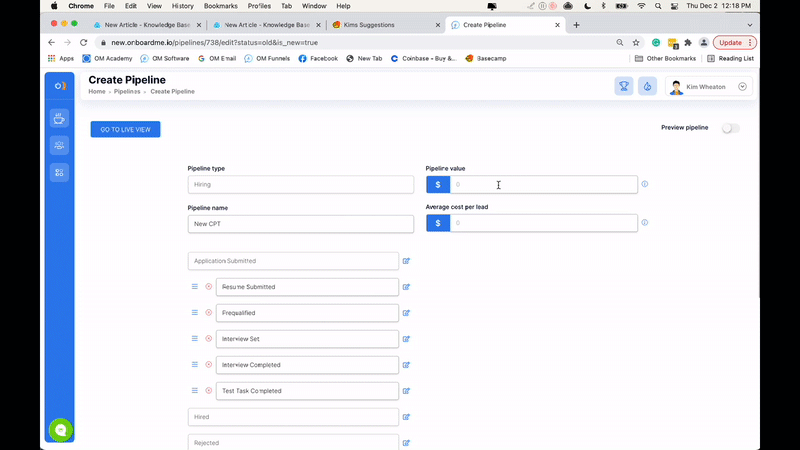
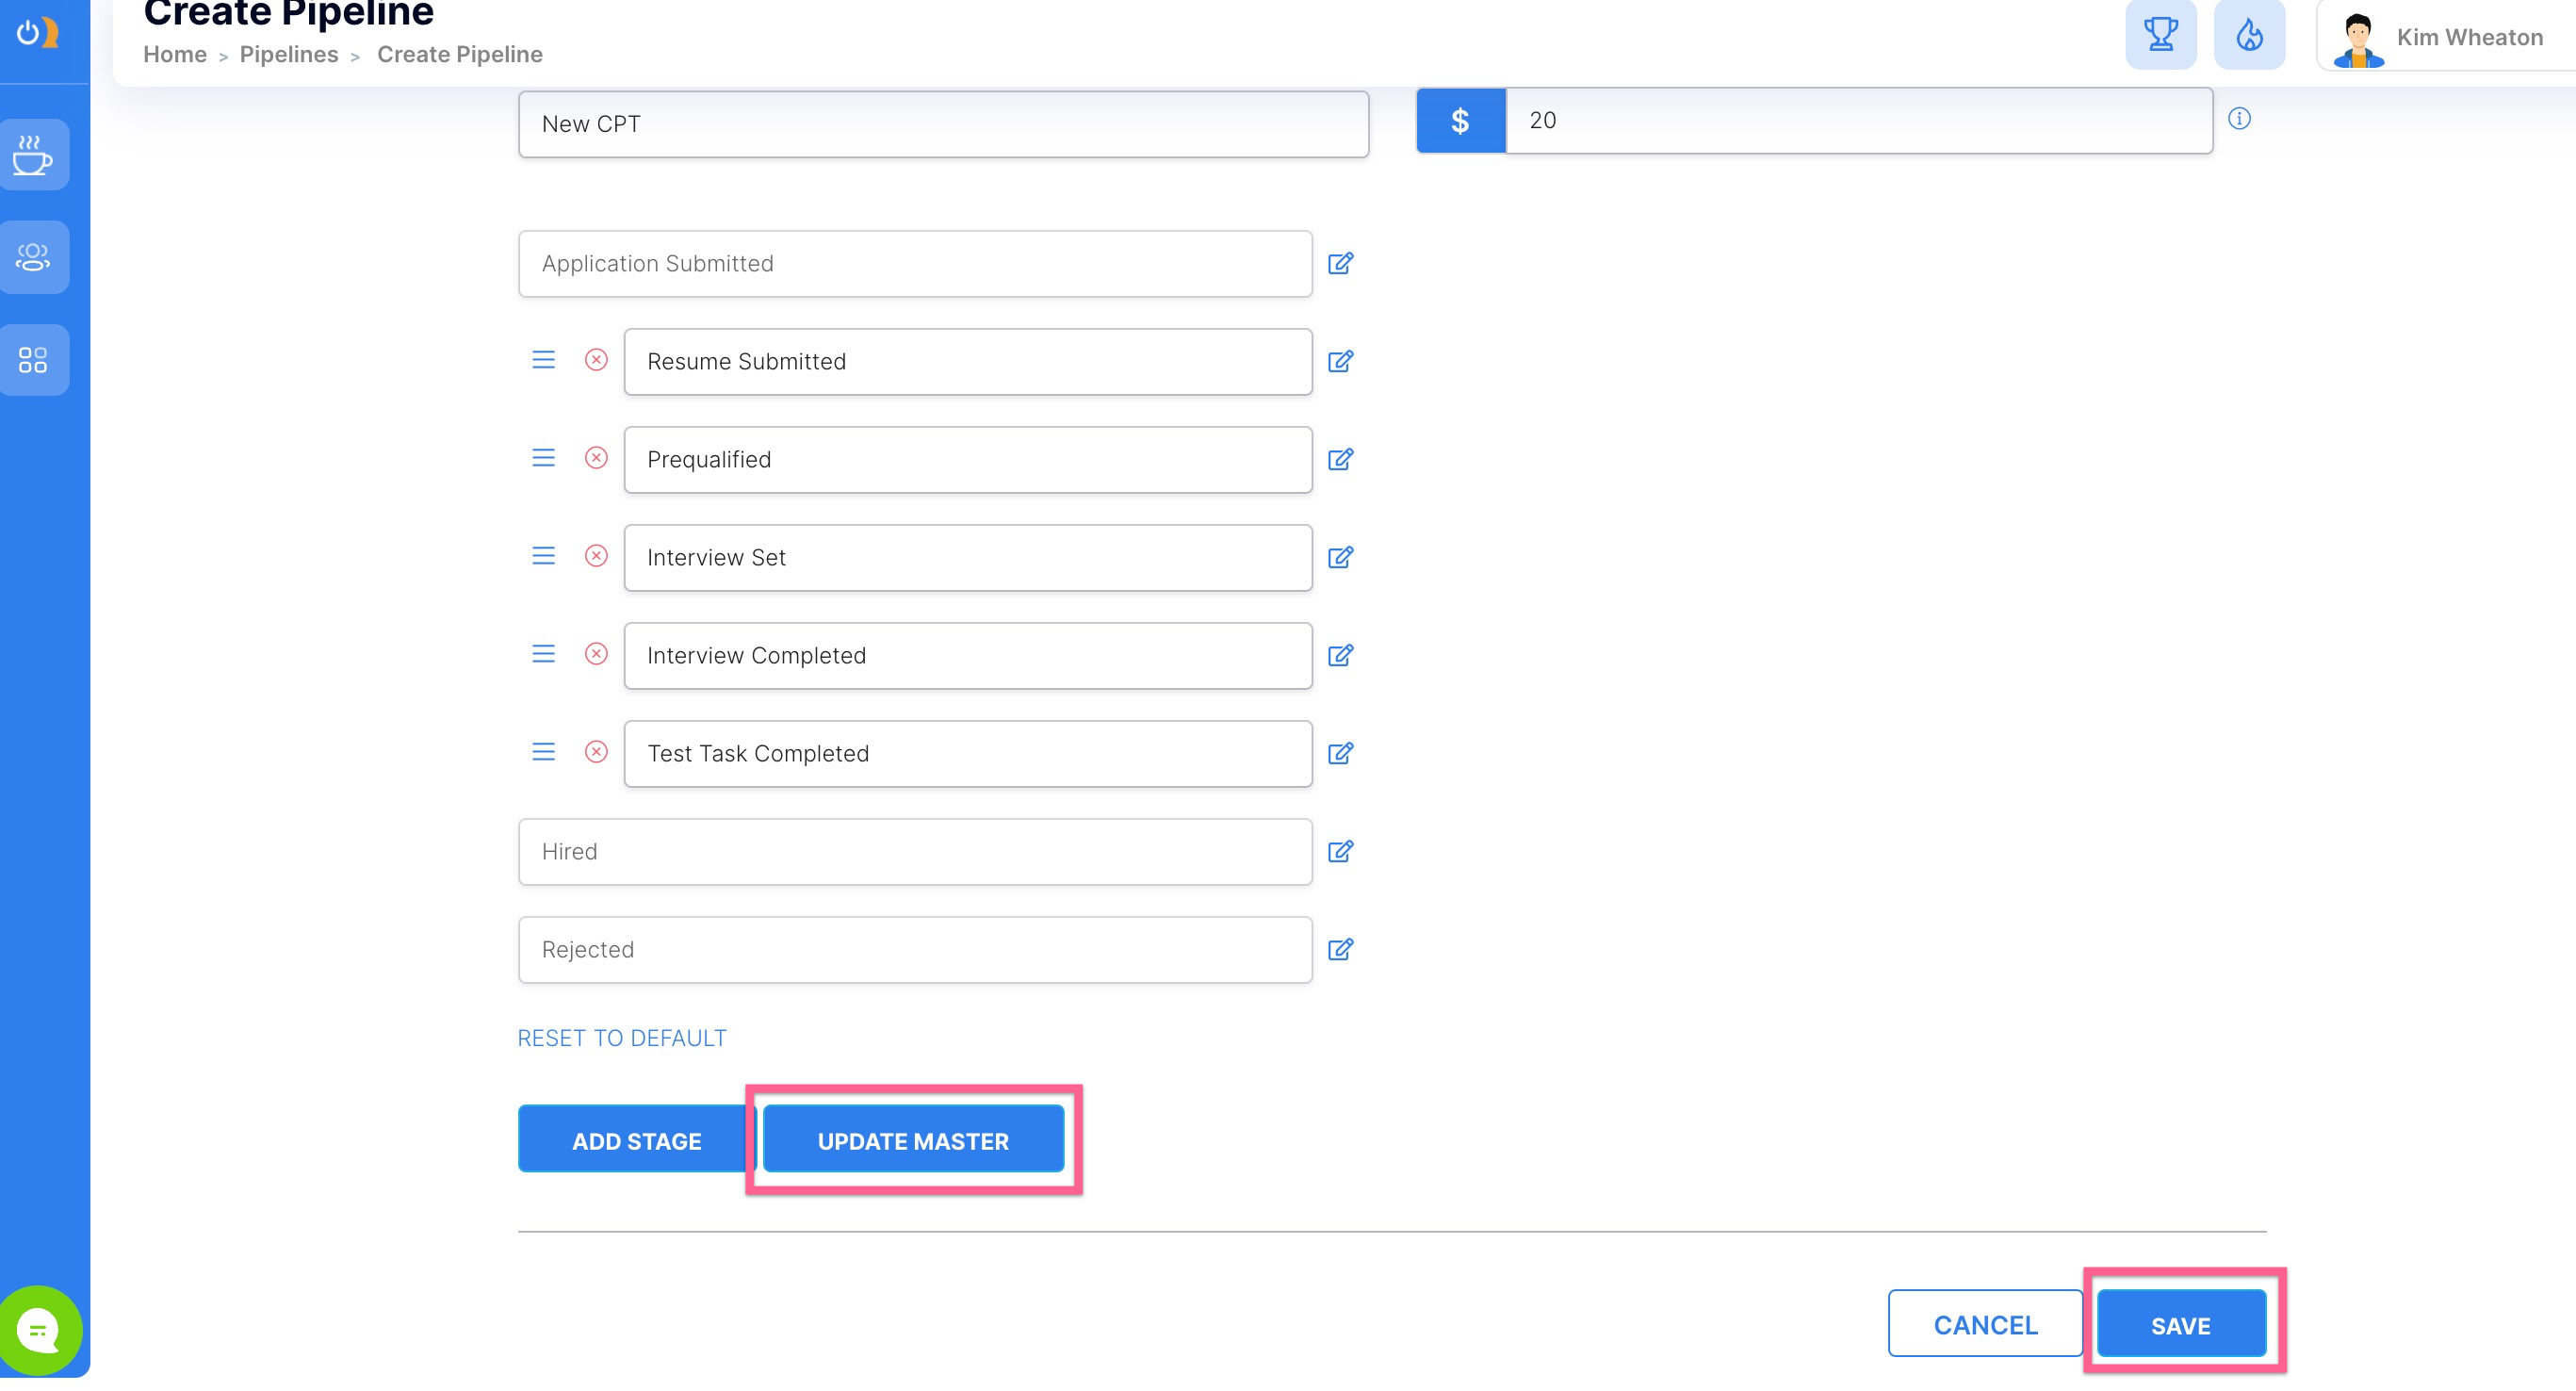
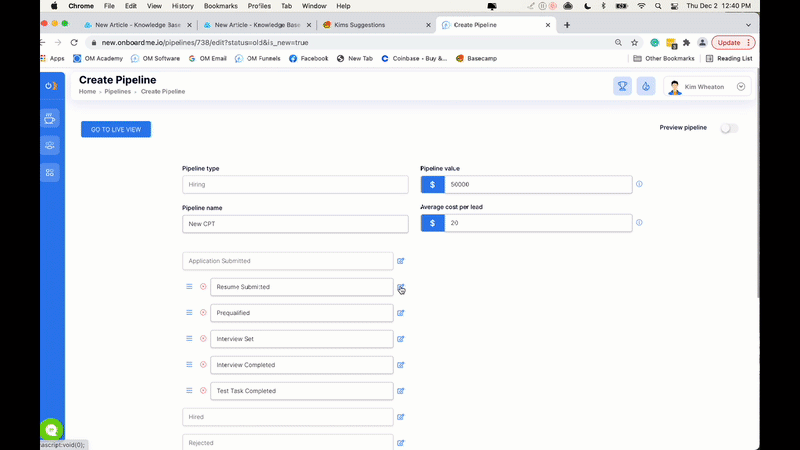
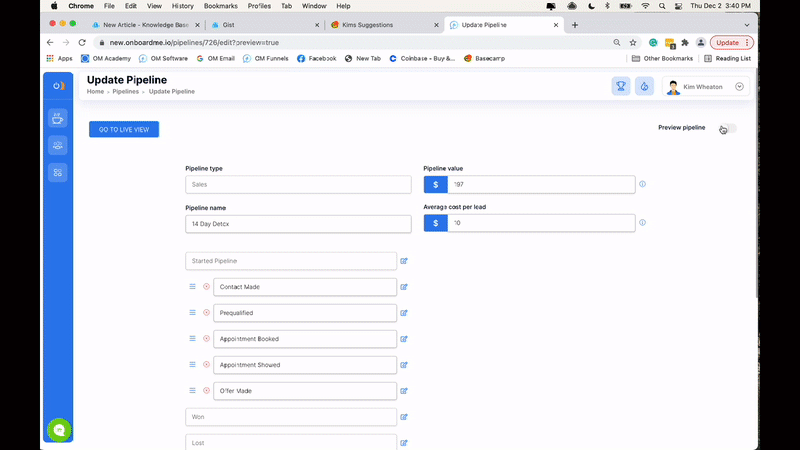
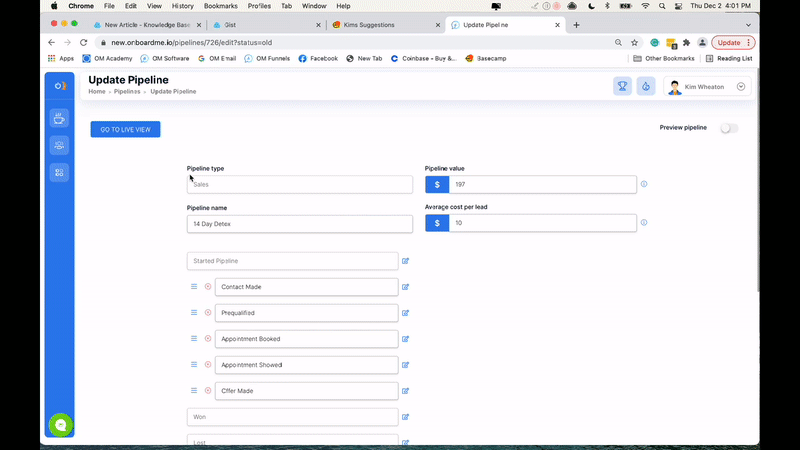
Set Your Stage Names and Overall Values
On your Pipeline settings page you can:
- Name your new pipeline
- Create, edit, reorder and delete stages
- Set a pipeline conversion value (how much you make if the contact hits the conversion goal, aka "won")
- Set an average cost you are paying to obtain a lead through paid advertising or barter
This allows us to calculate the probability and value of each stage as your pipeline is seasoned over time (and overall pipeline ROI). For example: Let's say a product you sell (28-day fitness jumpstart) is $300 and on average you are paying $20 per lead into your pipeline.
- You get 100 leads in your funnel, costing you (100 X $20) = $2,000
- You make 20 sales using the No Lead Left Behind system (20 X $300) = $6,000
OM algorithms would inform you that your Pipeline has a 3X value or 300% ROI. For every $1 you spend getting leads into your funnel, you are getting $3 back from your system. Now you know you can scale advertising and max out your returns. As long as your program is set up in Onboard Me, you'll have the assurance of time-tested and predictable results - scalability is infinite.
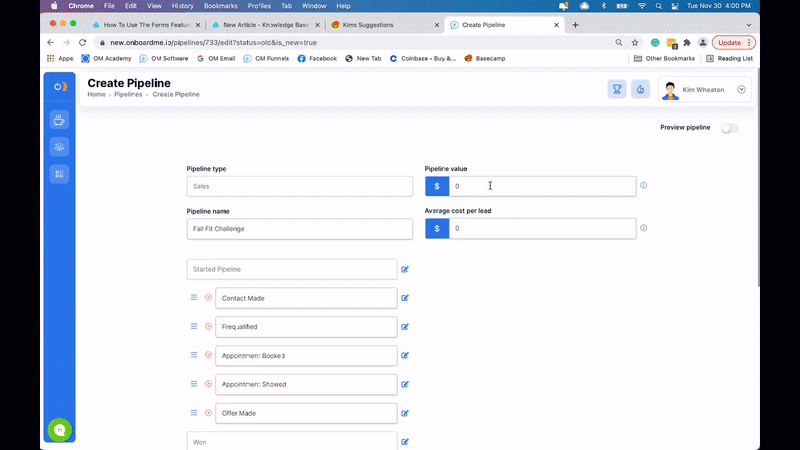
Pipeline name
Just name your pipeline something similar to the journey (if any) you want it to activate. Example:
- Trigger tag: "28-day jumpstart lead"
- Pipeline: "28-day jumpstart"
- Journey (if used): "28-day jumpstart"
- Sequence (if used): "28-day jumpstart"
Name continuity allows you to always know what's going on in your master systems, helps to identify weak areas, and troubleshoot. Ultimately, it creates an assistant out of your system.
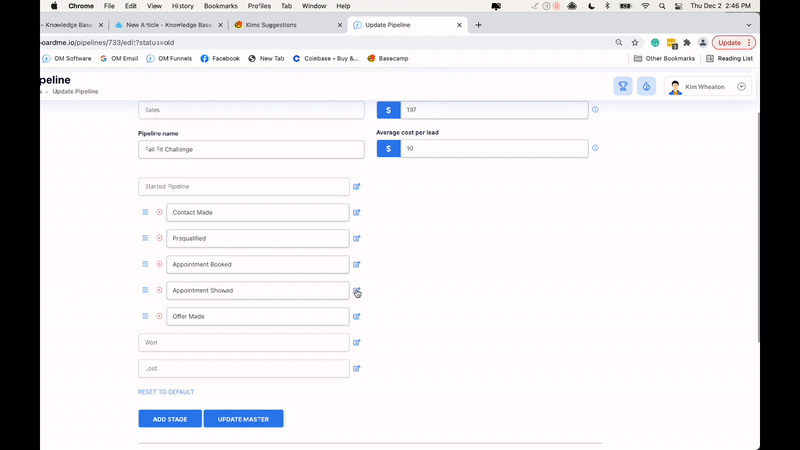
Add or configure your pipeline stage names and positions
Your pipeline has a minimum of 4 stages:
- Started Pipeline
- Made Contact
- Won (Conversion goal)
- Lost (Conversion fail)
You can configure your stages and stage names any way you want. The only stage name you can NOT change is "Started Pipeline," for obvious reasons. An example sales pipeline stage map for a fitness studio might look like this:
- Started Pipeline - Contact is added manually or automatically and the timer starts
- Made Contact - The contact and the pipeline owner text, email or talk on the phone
- Prequalified - The contact submits a pre-qual form or the owner feels they are a good fit
- Appointment Booked - The contact books a studio tour or a phone consult
- Appointment Showed - The contact makes the appointment
- Offer Made - The owner proposes a program to the contact
- Won - The contact accepts and pays
- Lost - The contact declines the offer
Let's say you are running ads to a landing page featuring a 28-day jumpstart, and you're getting 25 leads per day into your pipeline. Now you can see where every lead is within the buying process, from non-responsive to paid in full! Handling lead volume becomes a breeze and no lead gets left behind.
Set your pipeline conversion goal
A conversion goal is just another name for Won. Let's say you are hiring a new trainer and you know that over the course of one year, a bombshell trainer is worth $50,000 in profit to you.
- Your conversion goal would be: Trainer Hired
- Your failed conversion would be: Trainer Rejected
Set your pipeline value and cost per lead (if applicable)
So we stated above that a successful hire might be worth $50,000 per year after payroll and expenses. Your conversion goal might be $50,000.
Your cost per lead is the average cost you are paying to get one contact into your pipeline. If you are paying $400 a month to Indeed® to run your job posting, and that generates 20 applications for you per month, your average cost per lead is $20.
Save Your Pipeline or Your Master Template
If you chose to create your own pipeline type this is where you should save your work (and come back after to add actions). This way you have a great template to build similar pipelines from, and you can easily customize each to deploy different actions.
Configure Your Pipeline Stage Settings
Stage settings and stage actions are where the magic of pipelines really happens. In your stage settings, track stage probability, see actual stage value, set alerts, add tagging, create automatic card move conditions, and more.
Pipeline stage value
This is an advanced analytic that becomes more accurate as more traffic hits and progresses through your pipeline (200 applicants that have run through your pipeline will yield more accurate stage value data than after 10 applicants). Every contact is worth a percentage of the conversion goal and each stage has real value you can depend on once your pipeline is mature. This info in invaluable with paid advertising.
Pipeline stage probability
Again, the accuracy of this analytic is directly related to how much traffic has progressed through your pipeline. Those same 200 applicants have a certain probability of hitting the next pipeline stage. For example: Let's say your probability score on the Appointment Booked stage is sitting at 35% (on average, every lead you acquire has a 35% chance of booking a call with you). This is important information when it comes to scalability and using paid advertising because you know exactly what it costs to get an appointment booked.
For those who use commission-based salespeople, the cost per booked appointment and the number of booked appointments per month are both essential in estimating the number of salespeople you will need.
Pipeline stall alerts
With a significant number of leads running through your pipeline at any given time, the quality of those leads will vary considerably. Some will move through like clockwork. Others will stall.
This is what "stall alerts" are for. Stall alerts are messages sent to you (or anyone of your choosing) to let you know that a particular contact has been at a certain stage more than a reasonable (preset) time. The alert comes to you via text or email and simultaneously prompts the contact to reach out directly or change tactics.
Our default stall alert fires off when your contact has remained at a stage without moving forward for over 7 days. You can configure everything about this alert including the firing interval.
Stall alerts can be lifesavers for you and your team. They were built for coaches who love using our No Lead Left Behind™ methodology.
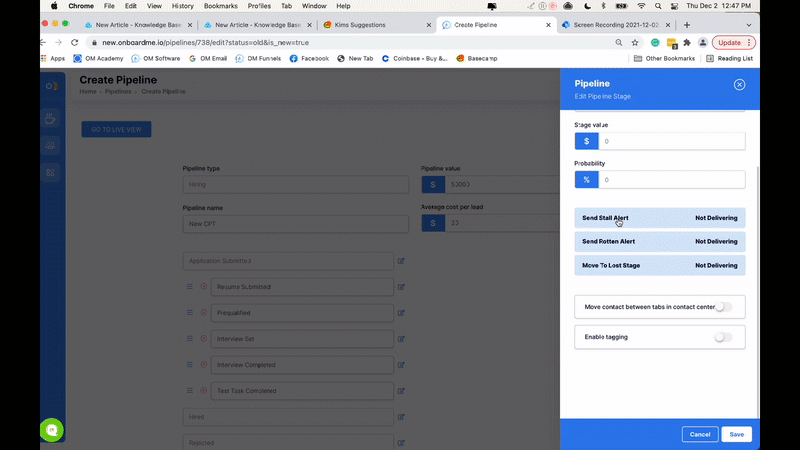
Pipeline rotten alerts
Like our stall alert above, the rotten alert means your contact has been stuck in one stage so long that they are rotting on the proverbial vine. It's time to take action before you lose them for good.
Rotten alerts are texted or emailed to you (or anyone you choose), indicating which contact(s) have been at a certain stage more than the set time. The same system will prompt the contact(s) to reach out or change tactics.
Our default rotten alert fires off when your contact has remained at a stage without moving forward for more than 14 days. You can configure everything about this alert including the firing interval.
Rotten alerts can be lifesavers for you and your team and were built for coaches with love using our No Lead Left Behind™ methodology.
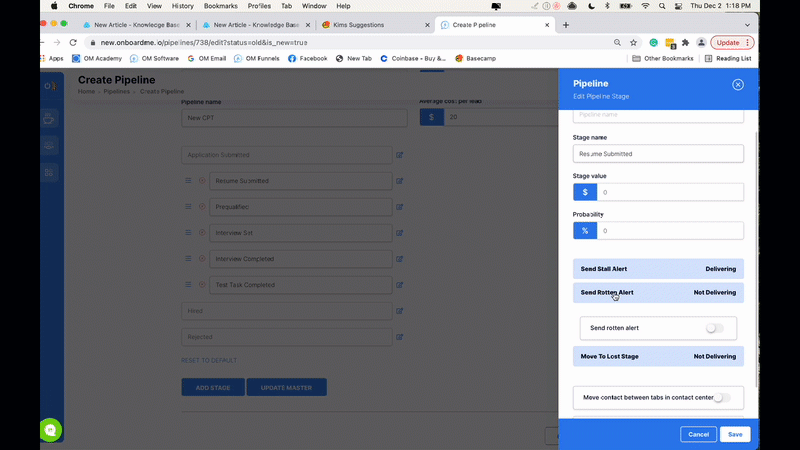
Move to lost stage
It's never a "no." It's just a "not now." That's why we have the lost stage. When a contact doesn't jump on your offer for weeks, think like Lloyd Christmas: "So you're telling me there's a chance!" and revisit him/her at another time.
For now, this contact should move into the Lost stage. This feature is activated after a certain time interval that you set. If the contact exceeds this interval and is still stuck at any stage prior to the Won Stage, Onboard Me will do the heavy lifting and move the contact to the lost stage in your pipeline so you can follow up later with value. A good start is to send a small gift or add the contact to your weekly newsletter.
Our default Move to lost setting is a 30 day time interval (contact remains at one stage without moving).
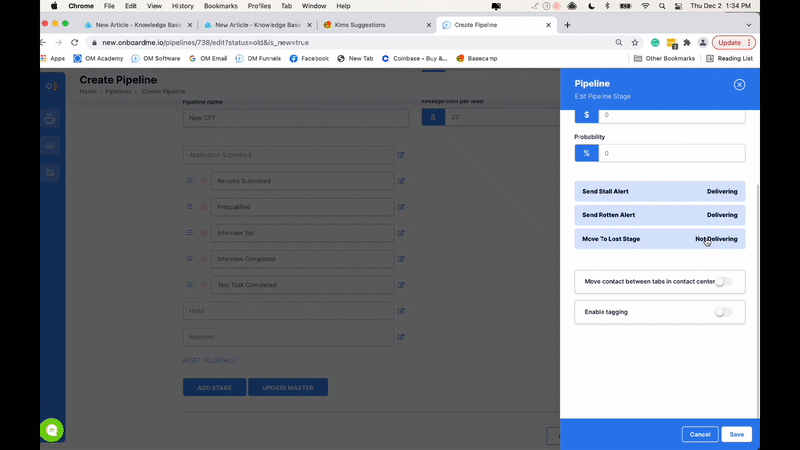
Move contact in the contact center
This is a really cool option you can toggle on so that your contact moves between tabs within the contact center. For example: If a new lead hits the "made contact" stage of your pipeline, with this toggle ON they will also be placed in the Made Contact TAB in your contact center.

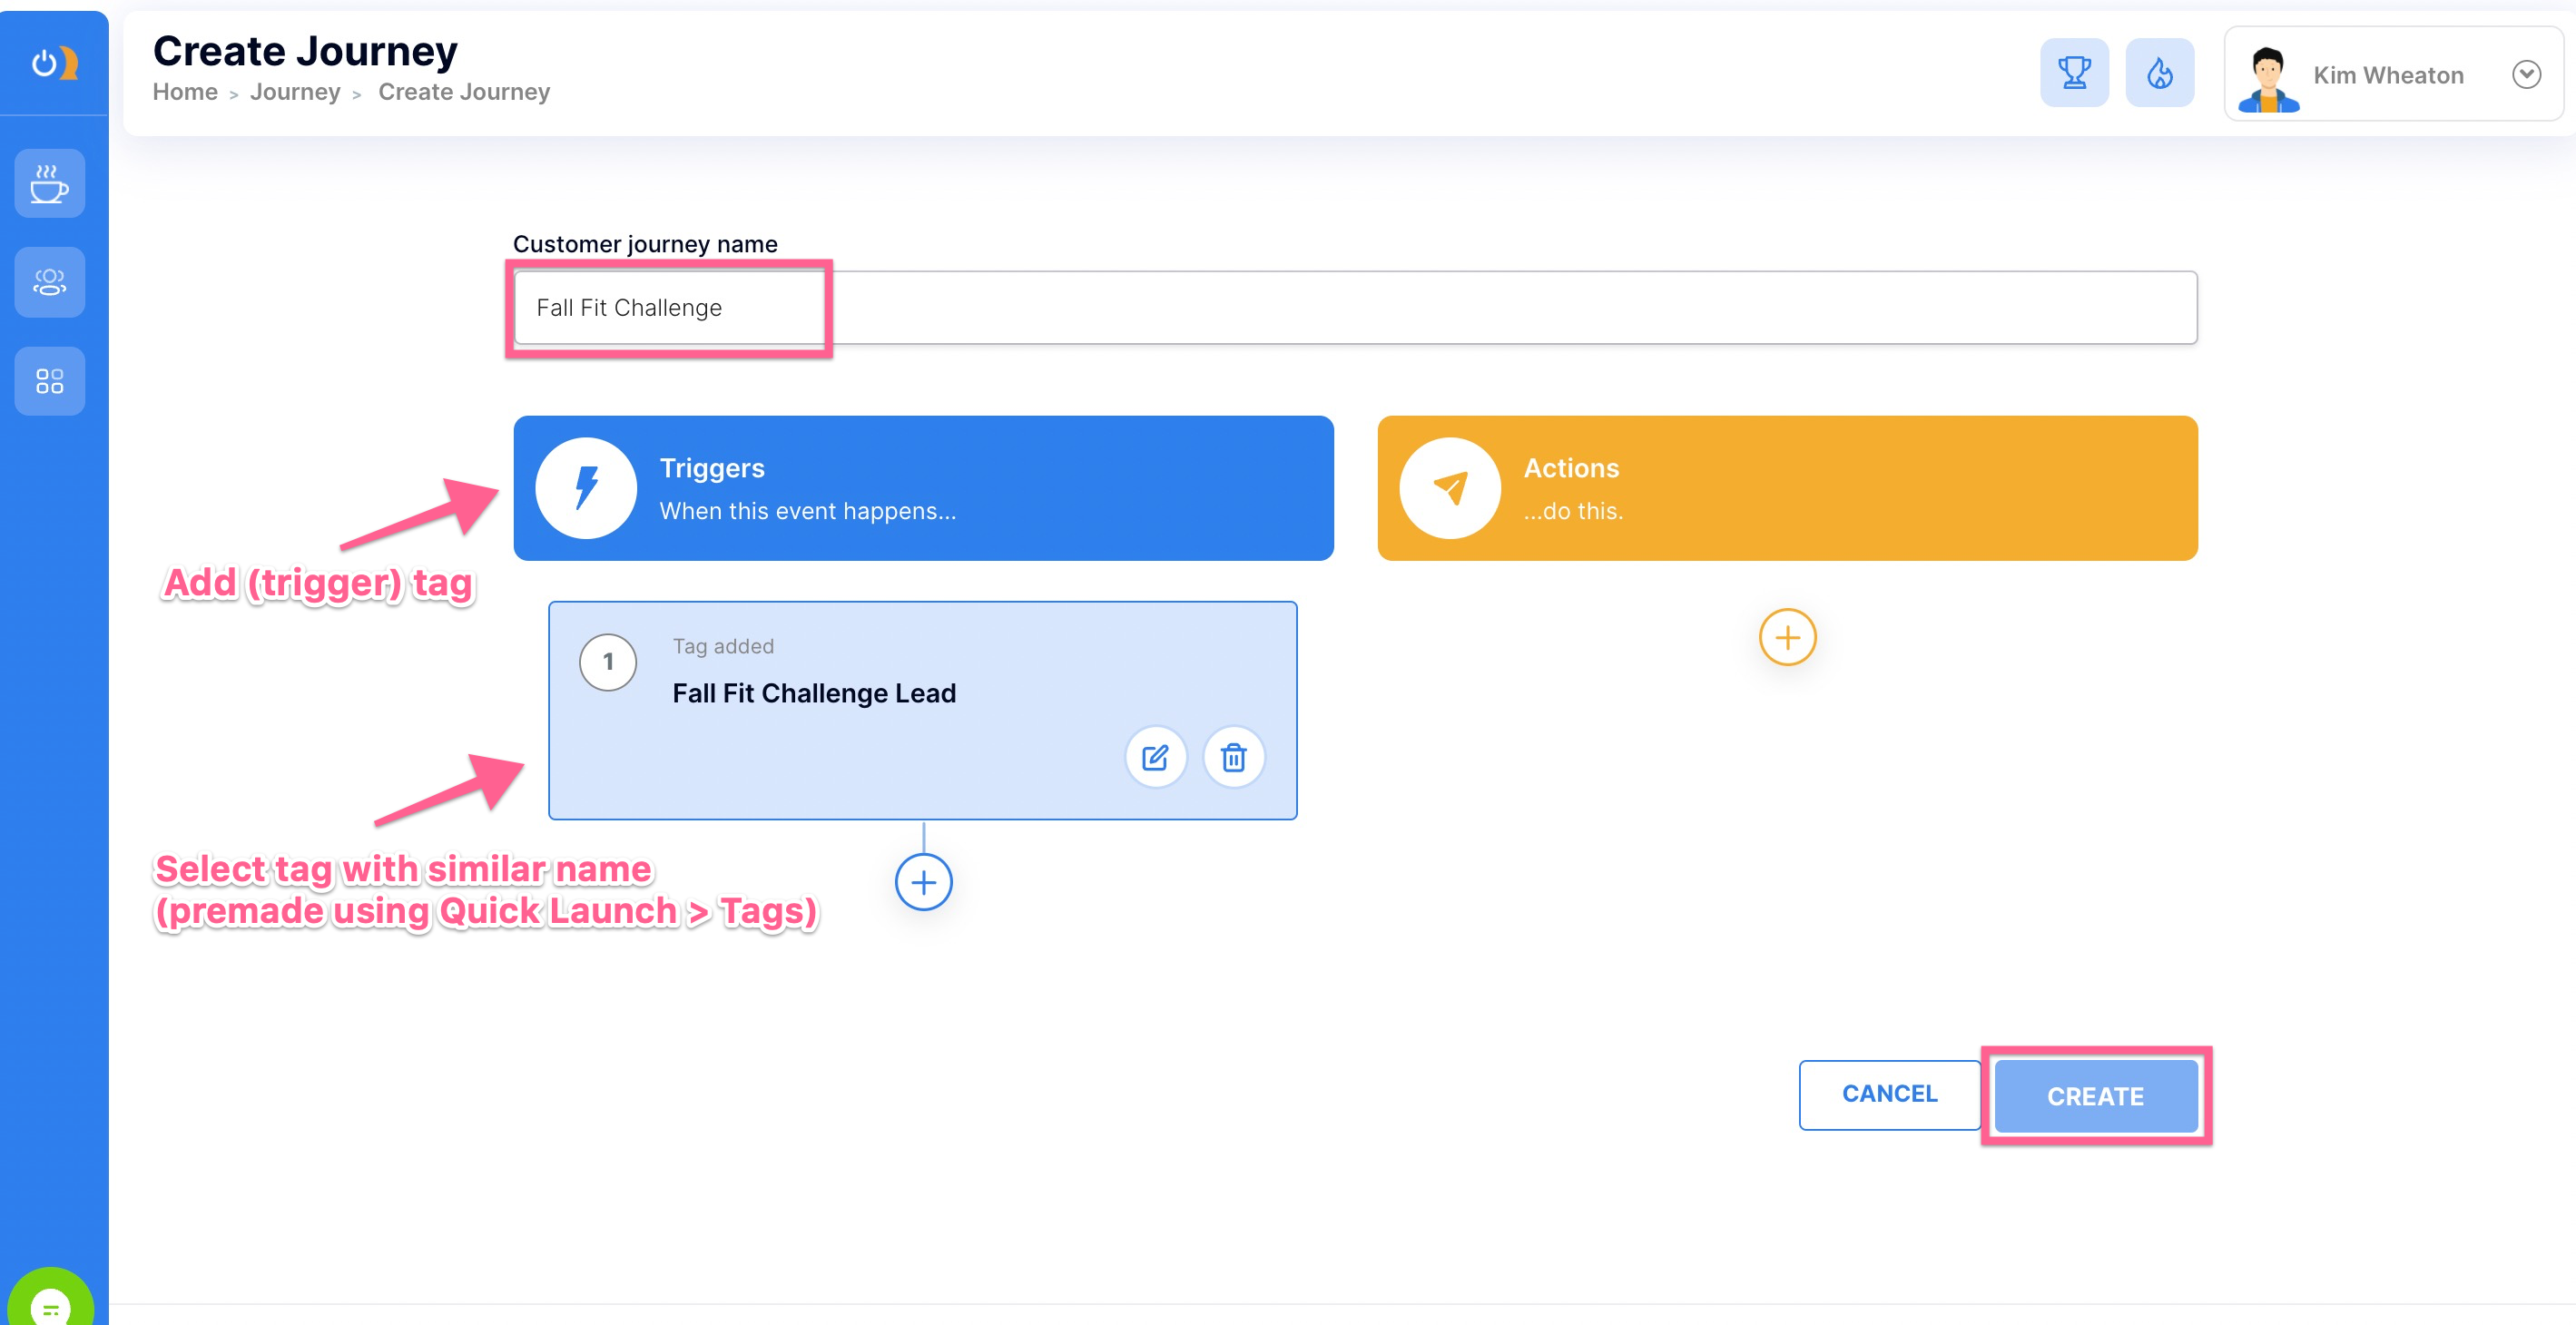
Tagging
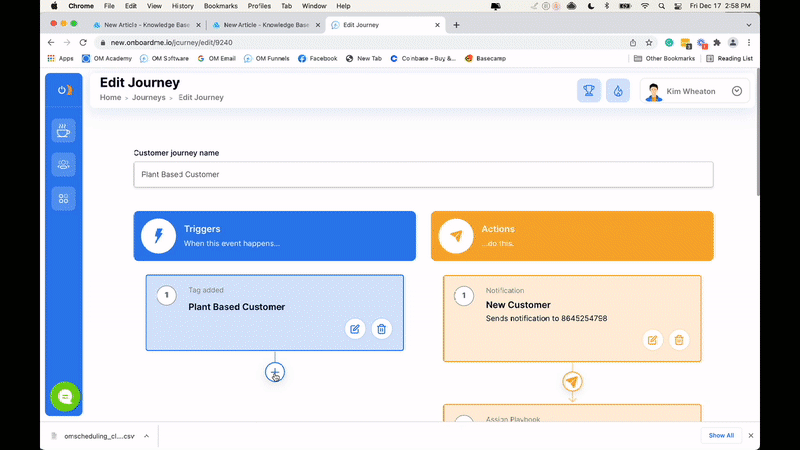
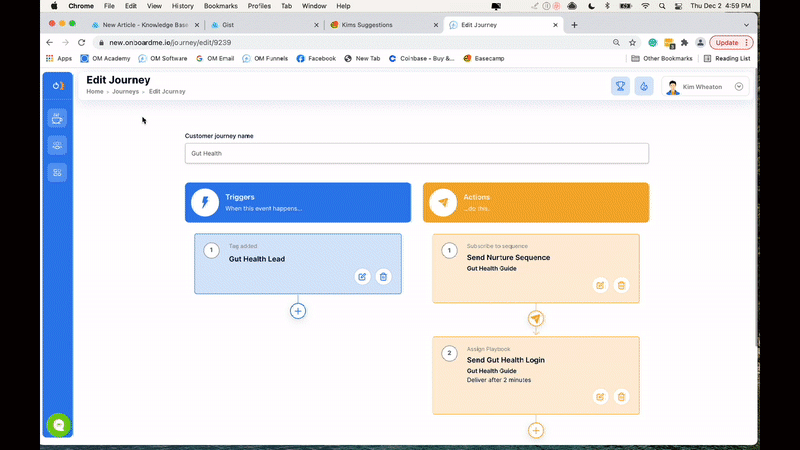
Tagging is a brilliant addition to your stage settings because it allows you to add and remove tags when a contact lands in that stage. This is great for identifying where contacts are in their journey via tags (and also for starting and stopping journeys). This is an advanced feature and we suggest you get a little pipeline experience before deploying tagging in your pipeline stages. Learn how to start using tags here.
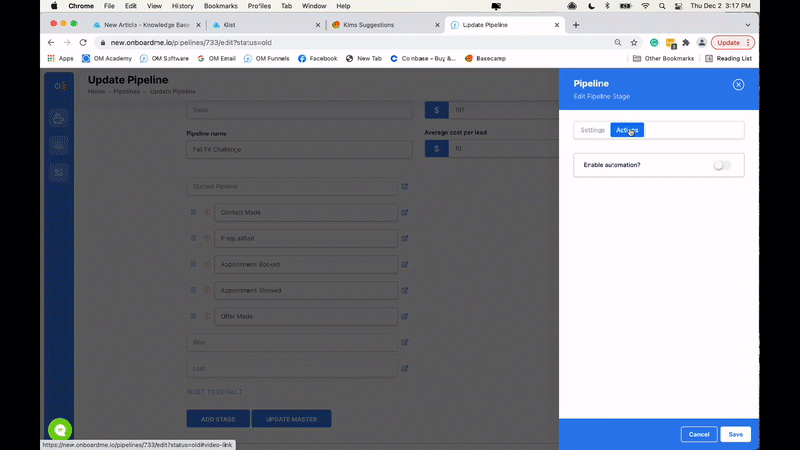
Add Your Pipeline Stage Actions (If Any)
At this point, you can add your pipeline actions (if any) to each stage. Think of actions as automated events that take place after the card is moved to this stage manually or through another automation like a journey.
This is advanced weaponry and we suggest you start with only one or two actions per stage, progressing as your pipeline skills grow.
Here is a list of actions you can add to any stage:
- Start or stop a sequence
- Add or remove a tag
- Send 3rd party notification
- Assign or restrict a playbook
- Send to a page
- Send to an SMS
- Send a template
- Send a form or agreement
- Send a single email
- Add reward points
- Terminate a journey
- Switch contact between tabs
- Add contact to a pipeline
- Assign task to contact or user
- Un-assign task from contact or user
- Mark task as complete or incomplete
- Start or stop progress tracking
Preview Or View Your Live Pipeline
By sliding the toggle to the ON position (right) in edit mode, you can see your pipeline stages and get a feel for what your team will see live. Then you can make any necessary changes.
To view your live pipeline from the pipelines dashboard, click the 3 dots on your pipeline thumbnail, then View Pipeline. From within the editor, simply click the button labeled Go to Live View, located on the upper left side of the page. Be sure to save your work before previewing or viewing your live pipeline.
The live view is where you will track progress, conversion stats, and review the pipeline performance in real-time.
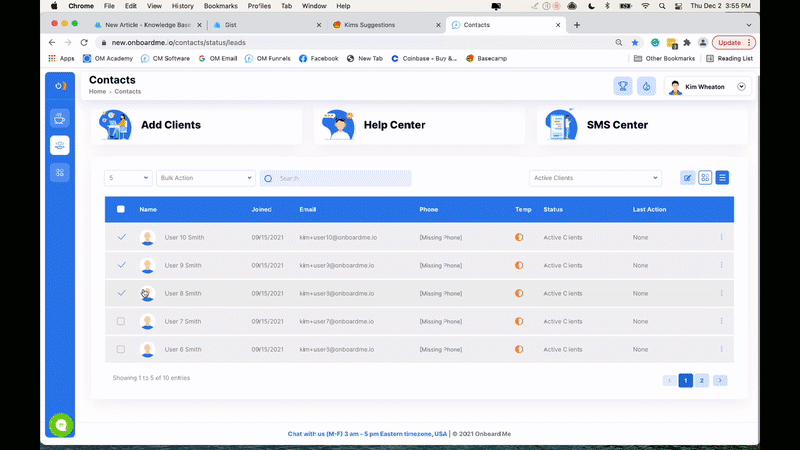
Add Contacts To Your Pipeline Manually
There are currently 4 ways to manually add contacts or leads to your pipelines:
1. Add contacts from your live pipeline page
2. Add contacts from your contact launchpad
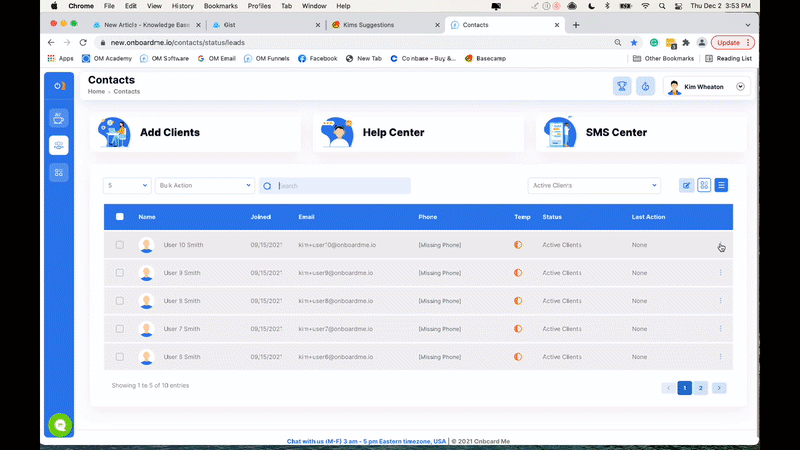
3. Add contacts using your bulk actions menu
4. Manually tag a contact with a trigger tag that starts a journey with 'Add to pipeline' as one of its actions
Move Contacts Between Stages Manually
Move contacts between stages manually by accessing your live view and dragging the cards to the desired column, releasing the card, and selecting OK from the warning modal.
Warning: If you have actions attached to a pipeline stage, then once you select OK there is no way to go back or reverse the process. The action will take place. This is great unless you did not intend for the actions to take place.
Add Contacts To Your Pipeline Automatically
Adding contacts to your pipeline automatically is usually done 1 of 3 ways:
- A contact submits a form that triggers a journey with "Add to pipeline'" as one of its actions (easiest).
- A contact opts into a Fit Funnels landing page that triggers a journey with 'Add to pipeline' as one of its actions (moderate).
- A journey is triggered via another automated tagging event (advanced).
Using a landing page like our VIP offer page and creating a tagging event that triggers the No Lead Left Behind journey is our most popular automated pipeline setup. You can get step-by-step instructions for this in OM Academy (white belt): Click here to watch video(s).
Move Contacts Between Pipeline Stages Automatically
This can be done in Journeys, using the journey action step "Switch contact between pipeline stages" located in your journey's actions.
Understanding Your Pipeline Contact Card
In your pipeline live view, you will see the contacts that have been added to your pipeline show up on the moveable cards. Here is what a single card in your pipeline looks like.
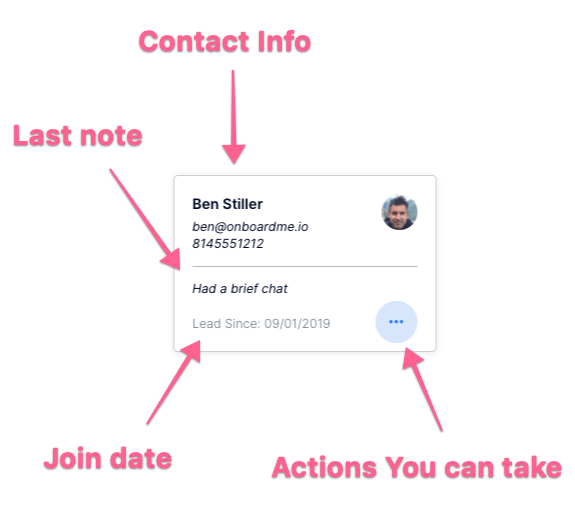
See it in action below:
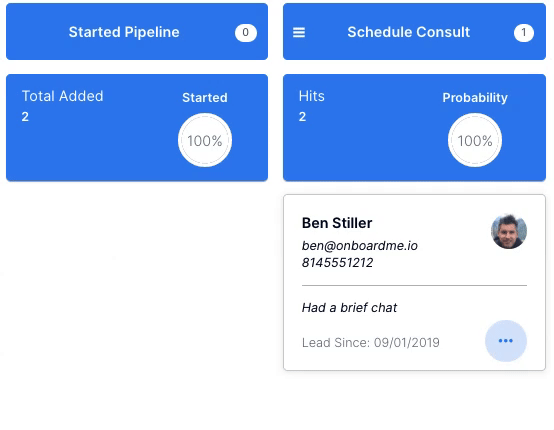 Actions you can take with the contact card:
- Delete the contact from the pipeline
- Edit the contact's details
- Move the contact between stages
- Call the contact via Twilio: coming soon!
- Add a note to the card (the last note will show on the card)
- Send the contact a personal email
- Open the contact launch pad and perform any action you choose
Reviewing Your Pipeline Analytics and What They Mean
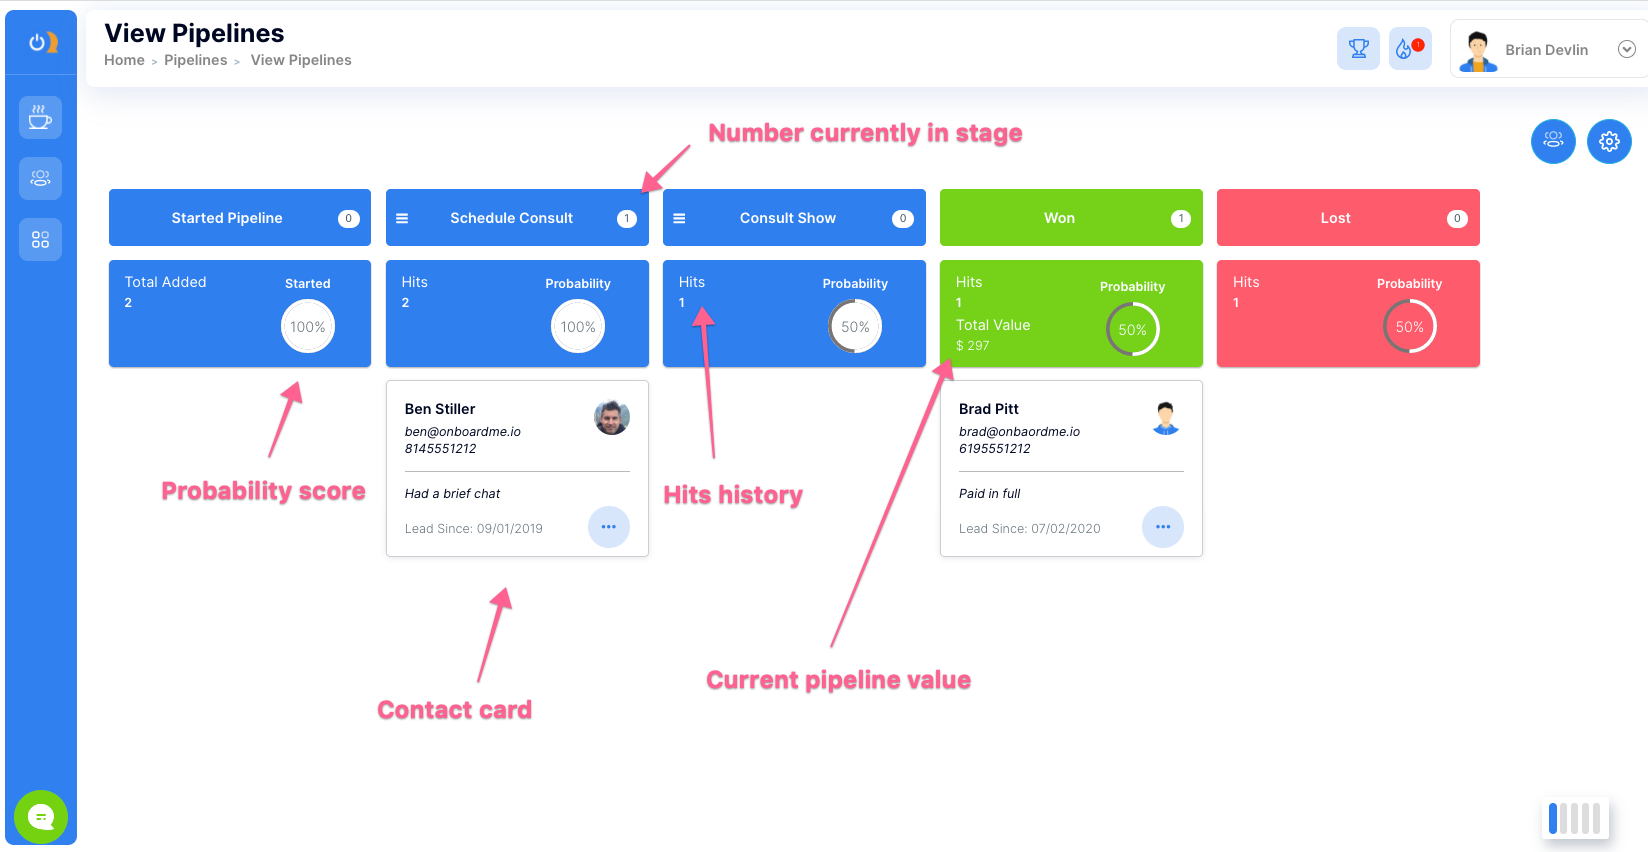
Stages
Stages are the columns or lanes in your pipeline. They represent a stage in a process. Cards are moved along stages to signify progress.
Stage hits
Stage hits are the total unique hits that stage has received. Each contact can only hit each stage one time. This helps us determine stage probability over time.
Stage probability
Stage probability is the likelihood that any contact that starts the pipeline will hit that stage. This is great if you have paid processes.
Example: My consult show stage has a probability of 30%. I pay $10 per lead. If I get 10 leads, I pay $100. Of those 10 leads, 3 will be in front of me. So I am paying roughly $34 to have a consult. If I close 50% of my consults, I am essentially paying $68 per customer. If my product is an online challenge and costs $299, then for every $100 I spend, I will collect $231 on average. This gives me a pipeline ROI of 231%.
For every $1.00 I spend, I should expect $2.31 before expenses.
Stage count
This is how many cards are in a stage or column at any given time.
Troubleshooting Your Pipeline
Easily edit your published pipeline by going to your Pipelines dashboard and clicking on the thumbnail title. Once in the editor, just click the area of the pipeline you wish to change. Make the desired changes and hit save.